
Easy Easter Dirt Cake Casserole: No-Bake Easter Dessert Fun!
Looking for a show-stopping easter dessert that requires zero oven time? Discover how to make the ultimate Easter Dirt Cake Casserole! This simple, crowd-pleasing recipe layers chocolatey ‘dirt,’ creamy filling, and fun Easter candies. Get the chef-approved steps, tips, and variations. Click here to create Easter magic!
Introduction
Ah, Easter! A time of renewal, family, and, let’s be honest, indulging in treats that make our hearts sing. But who wants to be tethered to the oven when there’s springtime joy to be had? Did you know that searches for “easy Easter desserts” spike by over 300% in the weeks leading up to the holiday? People crave simplicity without sacrificing festive charm. That, my friends, is where the magic of this Easter Dirt Cake Casserole comes in. It’s more than just a recipe; it’s a guaranteed smile-generator, a delightful trompe-l’œil that mimics a spring garden bed, complete with ‘dirt’ and ‘worms,’ but tastes like pure, creamy heaven. Prepare to wow your guests with minimal fuss and maximum flavour!
Table of Contents
1. Why This Easter Dirt Cake Casserole is Perfect for You:
This isn’t just any easter dessert; it’s a versatile champion for your holiday celebration. Let me tell you why this particular Easter Dirt Cake Casserole belongs on your menu:
- 🟩 Effortless Elegance: It looks impressive, like you’ve spent hours crafting it, yet it’s wonderfully simple – no baking required! Perfect for busy hosts.
- 🟩 Crowd-Pleasing Flavour: The combination of chocolate cookies, creamy cheesecake-like filling, and rich pudding is universally loved by kids and adults alike.
- 🟩 Festive Fun Factor: It’s inherently playful! Decorating it with Easter candies turns dessert preparation into a fun activity, especially if you have little helpers. It becomes a conversation piece.
- 🟩 Make-Ahead Marvel: You can assemble this entire Easter Dirt Cake Casserole the day before, letting the flavours meld beautifully and freeing up your Easter Sunday. Less stress, more celebration!
- 🟩 Customizable Canvas: Easily adaptable to different dietary needs (gluten-free Oreos, anyone?) or flavour preferences (try different pudding flavours!).
2. Ingredients List
For this magnificent Easter Dirt Cake Casserole, we need ingredients that speak of comfort and delight. Quality matters, even in simplicity! Here’s your treasure map to flavour:
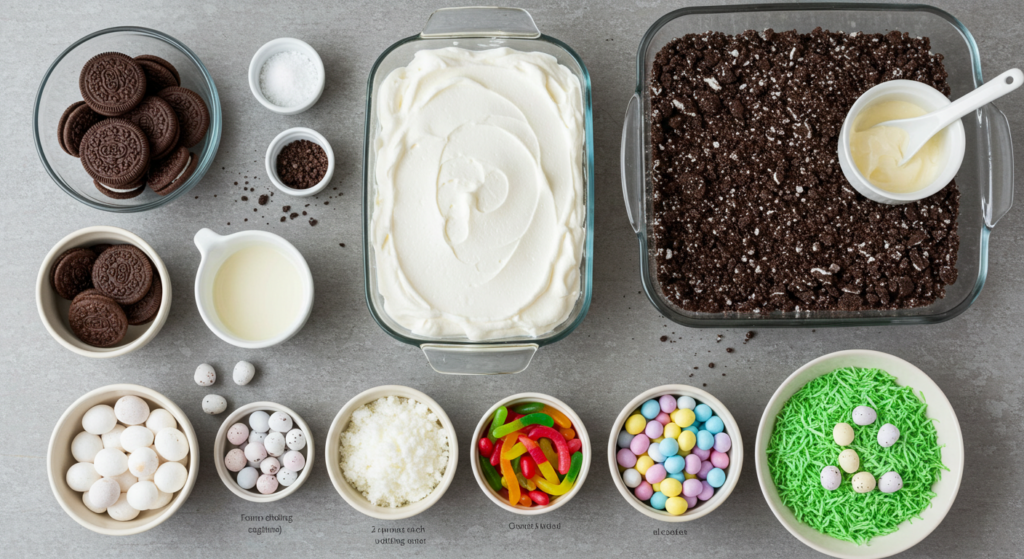
- For the ‘Dirt’:
- 1 package (14-16 oz) Chocolate Sandwich Cookies (like Oreos) – Seek that deep, intense chocolate crunch! Regular or Double Stuf both work.
- 1/2 cup (1 stick or 113g) Unsalted Butter, melted – This binds our ‘soil’ together.
- For the Creamy Layer:
- 1 package (8 oz or 226g) Cream Cheese, softened – Ensure it’s truly soft for a velvety, lump-free texture.
- 1 cup (120g) Powdered Sugar, sifted – Sifting prevents little clumps, ensuring pure smoothness.
- 1 container (8 oz or 227g) Whipped Topping (like Cool Whip), thawed – Or use 1.5 cups of freshly whipped heavy cream, sweetened.
- For the Pudding Layer:
- 2 packages (3.4 oz or 96g each) Instant Vanilla Pudding Mix – Classic choice, but French Vanilla or Cheesecake flavour adds a lovely twist! Chocolate works too for double-chocolate lovers.
- 3 cups (710ml) Cold Milk – Whole milk yields the richest result.
- For the Festive Finish (The Fun Part!):
- Gummy Worms – Essential for any ‘dirt’ cake!
- Easter Candies: Chocolate Eggs, Jelly Beans, Peeps, Pastel M&Ms – Let your creativity bloom!
- Optional: Shredded Coconut tinted green (mix coconut with a drop of green food colouring) for ‘grass’.
Substitutions: Use gluten-free chocolate sandwich cookies for a GF version. Sugar-free pudding and whipped topping can be used for a lower-sugar option, though the texture might vary slightly.
3. Preparation Time and Servings
Time is precious, especially during holidays. This Easter Dirt Cake Casserole respects that! It’s significantly faster to assemble than many baked desserts.
- Total Time: Approximately 4 hours 30 minutes (mostly chilling time)
- Preparation Time: 25-30 minutes (Quick and Easy!)
- Chilling Time: At least 4 hours, or preferably overnight.
- Servings: 12-15 servings (using a 9×13 inch casserole dish)
4. Step-by-Step Instructions and Directions
Alright, let’s get our hands dirty (pun intended!) and assemble this masterpiece. Follow these simple steps for your perfect Easter Dirt Cake Casserole.
- Step 1: Create the Chocolate ‘Dirt’
- Place the chocolate sandwich cookies (entire cookie, filling and all!) into a food processor. Pulse until they resemble coarse crumbs – think rich, dark soil. Chef’s Tip: If you don’t have a food processor, place cookies in a large zip-top bag and crush them with a rolling pin. A little therapeutic, no?
- In a medium bowl, combine the cookie crumbs with the melted butter. Stir until evenly moistened.
- Press about two-thirds of this buttery crumb mixture into the bottom of a 9×13 inch casserole dish or baking pan. Reserve the remaining one-third for the topping. Pro Tip: Use the bottom of a glass to press the crumbs firmly and evenly.
- Step 2: Whip Up the Cream Cheese Layer
- In a large bowl, beat the softened cream cheese with an electric mixer until smooth and creamy. No lumps allowed here!
- Gradually beat in the sifted powdered sugar until well combined.
- Gently fold in the thawed whipped topping until just combined. Do not overmix; we want to keep it light and airy.
- Spread this luscious cream cheese mixture evenly over the cookie crust. Patience here ensures beautiful layers.
- Step 3: Prepare the Pudding Layer
- In another large bowl, whisk together the two packages of instant vanilla pudding mix and the cold milk.
- Continue whisking for about 2 minutes, or until the pudding begins to thicken. It should be nice and thick, not runny.
- Carefully spread the prepared pudding over the cream cheese layer.
- Step 4: Assemble and Chill Your Easter Dirt Cake Casserole
- Sprinkle the reserved one-third of the cookie crumb mixture evenly over the pudding layer. This is your top layer of ‘dirt’.
- Cover the casserole dish tightly with plastic wrap or a lid.
- Refrigerate for at least 4 hours, but overnight is even better. This allows the layers to set firmly and the flavours to meld beautifully. This chilling step is crucial for the perfect texture!
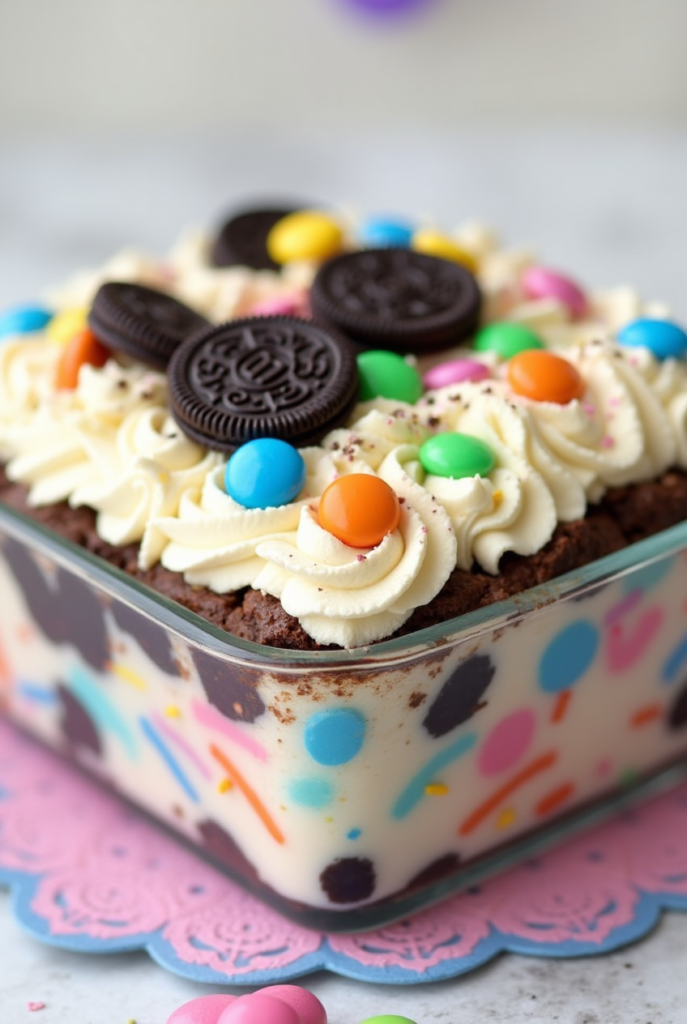
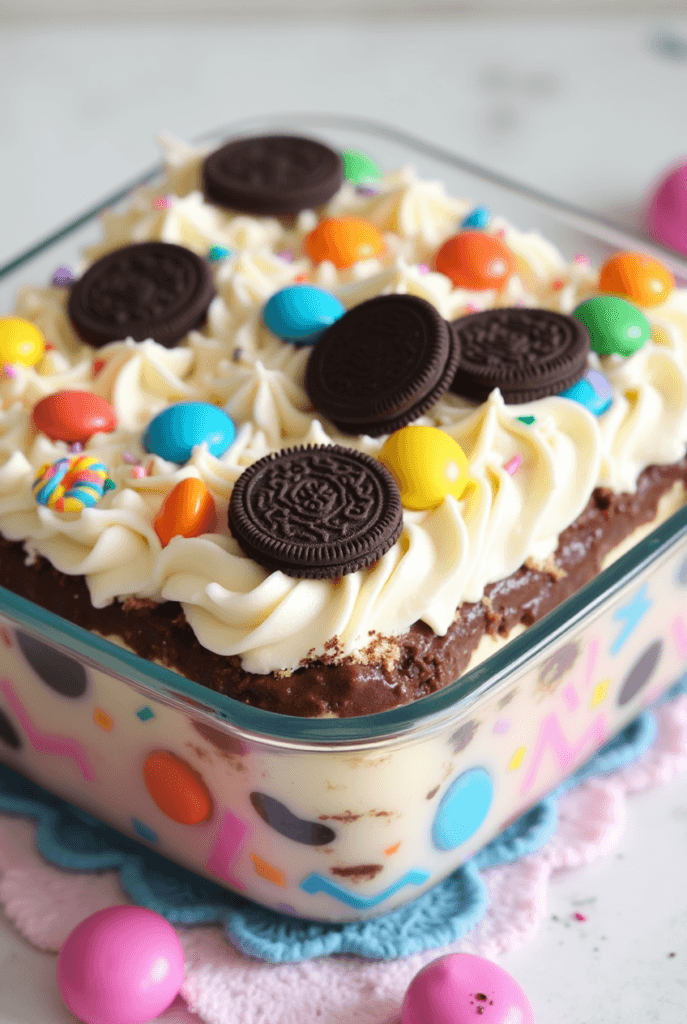
- Step 5: Decorate and Serve
- Just before serving, unleash your inner artist! Arrange gummy worms so they appear to be crawling in and out of the ‘dirt’.
- Strategically place your Easter candies – Peeps standing proudly, chocolate eggs nestled in, jelly beans scattered like colourful pebbles. Add tinted green coconut ‘grass’ if desired.
- Slice and serve your magnificent Easter Dirt Cake Casserole chilled. Voilà!
5. Nutritional Information
While this Easter Dirt Cake Casserole is undeniably an indulgence (as festive treats should be!), here’s a general idea of what a serving might contain. Please note these are estimates and can vary based on specific ingredients used.
- Serving Size: Approximately 1/12th of the casserole
- Calories: 450-550 kcal (estimated)
- Fat: High (from butter, cream cheese, cookies, whipped topping)
- Sugar: High (from cookies, sugar, pudding, candies)
- Protein: Moderate
- Carbohydrates: High
This is a celebratory dessert, best enjoyed in moderation as part of a balanced Easter feast!
6. Calories per Serving
A typical serving (around 1/12th of a 9×13 pan) of this Easter Dirt Cake Casserole contains approximately 450-550 calories. Portion size and specific brand ingredients will influence the exact count.
8. Healthier Alternatives for the Recipe
Want to lighten up this decadent easter dessert? Here are a few chef-approved swaps:
- Lighter Cookies: Opt for reduced-fat chocolate sandwich cookies. For a gluten-free version, use certified GF cookies.
- Cream Cheese: Use Neufchâtel cheese (often labelled as 1/3 less fat cream cheese) instead of full-fat cream cheese.
- Sweetness Control: Consider using sugar-free instant pudding mix and sugar-free whipped topping. Be mindful that artificial sweeteners can alter the taste slightly.
- Portion Size: Serve smaller portions or offer it alongside a fresh fruit salad.
Remember, even with swaps, this remains a treat, but these adjustments can make it a bit lighter.

9. Serving Suggestions
Presentation elevates everything! Here’s how to serve your Easter Dirt Cake Casserole with flair:
- Classic Casserole: Serve directly from the decorated 9×13 dish for a rustic, family-style feel. A clear glass dish beautifully showcases the layers.
- Individual Portions: Assemble the dessert in individual clear cups, parfait glasses, or small mason jars for elegant single servings. Layer crumbs, cream cheese mix, pudding, and top ‘dirt’, then decorate each one. Perfect for portion control and mingling guests.
- Garnish Extravaganza: Beyond the worms and Easter candy, consider adding edible flowers (like pansies) for a sophisticated spring touch, or a dusting of cocoa powder before adding the candies.
- Perfect Pairing: This dessert is rich, so serve it with coffee, tea, or a cold glass of milk. It needs no accompaniment but stands proudly on its own. A perfect side dish for this Easter Dirt Cake Casserole doesn’t exist – it IS the star!
10. Storage and Leftovers
Proper storage keeps your Easter Dirt Cake Casserole delightful for days.
- Storage: Cover the casserole dish tightly with plastic wrap or an airtight lid. Store leftovers in the refrigerator.
- Freshness: It will stay fresh and delicious for up to 3 days. Note that the cookie crumbs will soften over time, but many find this texture equally enjoyable!
- Make-Ahead: This recipe is ideal for making ahead! Assemble the entire casserole (without the final candy decorations) up to 24 hours in advance and store it covered in the fridge. Add the candies just before serving to keep them looking their best.
- Freezing: While possible, freezing can alter the texture of the cream cheese and pudding layers upon thawing. I recommend enjoying it fresh within 3 days for the optimal experience.
11. Common Mistakes to Avoid
Even simple recipes have potential pitfalls. Avoid these common mistakes for Easter Dirt Cake Casserole perfection:
- Mistake #1: Runny Pudding: Using the wrong amount of milk or not whisking the instant pudding long enough can result in a runny layer that doesn’t set properly. Follow package directions precisely and ensure it thickens before spreading.
- Mistake #2: Lumpy Cream Cheese Layer: Not softening the cream cheese sufficiently before beating leads to lumps. Let it sit at room temperature for at least an hour, or gently microwave in short bursts (be careful not to melt it!).
- Mistake #3: Insufficient Chilling: Rushing the chilling time means the layers won’t set firmly, resulting in a messy, less defined slice. Give it the full 4 hours, or preferably overnight. Patience is a virtue in dessert making!
- Mistake #4: Over-processing Crumbs: Pulverizing the cookies into fine dust removes the pleasant texture contrast. Aim for coarse crumbs with some slightly larger pieces remaining.
- Mistake #5: Decorating Too Early: Adding candies, especially those with colours that might bleed (like some jelly beans or sprinkles), long before serving can lead to colours running onto the cream layers as condensation forms. Decorate just before you plan to serve.
12. FAQs
Let’s tackle some common questions about crafting the perfect Easter Dirt Cake Casserole:
- Q1: Can I make this Easter Dirt Cake Casserole ahead of time?
- A: Absolutely! Assemble it completely (steps 1-4), cover tightly, and refrigerate for up to 24 hours. Add the decorative candies just before serving. It’s a fantastic make-ahead easter dessert.
- Q2: Can I use a different flavour of pudding?
- A: Yes! Chocolate pudding creates a double-chocolate delight. French vanilla, cheesecake, or even white chocolate pudding work beautifully too. Experiment and find your favourite!
- Q3: Can I use homemade whipped cream instead of whipped topping?
- A: Certainement! Whip 1.5 cups of heavy cream with about 1/4 cup of powdered sugar and 1 tsp vanilla extract until stiff peaks form. Gently fold this into the cream cheese mixture. Note that homemade whipped cream might not hold its structure quite as long as stabilized whipped topping, but the flavour is divine.
- Q4: Is this recipe kid-friendly to make?
- A: Extremely! Kids love crushing the cookies (in a bag!), helping to stir, spreading layers (with a little guidance), and especially decorating with candies and worms. It’s a wonderful way to get them involved in Easter preparations.
- Q5: How do I make a gluten-free Easter Dirt Cake Casserole?
- A: Simply substitute the regular chocolate sandwich cookies with your favourite brand of gluten-free chocolate sandwich cookies. Ensure all other ingredients (pudding mix, toppings) are certified gluten-free if needed for severe allergies.
- Q6: Can I freeze leftovers?
- A: While technically possible, freezing can negatively impact the texture of the pudding and cream cheese layers, making them slightly watery or grainy upon thawing. For the best taste and texture, it’s recommended to enjoy it fresh within 3 days of refrigeration.
16. Conclusion
There you have it, my culinary adventurers – the roadmap to creating a truly memorable, fun, and delicious Easter Dirt Cake Casserole. It’s proof that impressive desserts don’t need to be complicated. This no-bake wonder brings together beloved flavours and textures in a presentation that’s pure springtime joy. It’s the perfect easter dessert to share with family and friends, sparking smiles and satisfying sweet cravings.
We hope you enjoy making, decorating, and devouring this Easter Dirt Cake Casserole as much as we do! Don’t forget to share your colourful creations and experiences with us in the comments below – we love seeing your culinary triumphs! Happy Easter!
Contact Us
Contact us at [email protected], and we’ll get back to you as soon as possible.
Share your experience with us
good for a nice dinner
nice